Difference between revisions of "Workspace"
(→Begin translating) |
(→Begin translating) |
||
| Line 129: | Line 129: | ||
===Begin translating=== | ===Begin translating=== | ||
| − | '''7.''' From your dashboard you can navigate to the translation screen in two ways. The first is from the '''Component''' column. Click on the project/language you want to translate. This will take you to the '''Overview''' screen of the main translation page for that language. Here you will see links that can take you to the general translation screen or to filtered sets of strings for translation. | + | '''7.''' From your dashboard you can navigate to the translation screen in two ways. The first way is from the '''Component''' column. Click on the project/language you want to translate. This will take you to the '''Overview''' screen of the main translation page for that language. Here you will see links that can take you to the general translation screen or to filtered sets of strings for translation. Clicking on the <code>Translate</code> button or one of the filtered sets will take you to the translation screen. |
[[File:weblate-translation-links.png|frameless|500px|center|Translating]] | [[File:weblate-translation-links.png|frameless|500px|center|Translating]] | ||
| − | + | The second way is to click on the <code>Translate</code> button to the right of the language you want to translate. This will take you directly to the translation screen. | |
| + | Once you have reached the translate screen you will see a list of items needing translation. Each item shows (1) the source string (location in the Artefactual database), (2) translations in any languages you are watching, (3) the term to be translated, and (4) the edit area for your translation. | ||
| + | [[File:edit-screen.png|frameless|500px|center|Adding Translations]] | ||
| − | '''8.''' | + | '''8.''' The default view is '''Zen''' mode - a simplified screen in which you see a list consisting of the source string, source string comment and translations from secondary language choices if you have any, and a field in which to enter the translation in your chosen language. In the screenshot below you see that the language chosen for translation is Czech and the secondary language is Austrian German. |
[[File:weblate-translation-strings.png|frameless|500px|center|Translation entry fields]] | [[File:weblate-translation-strings.png|frameless|500px|center|Translation entry fields]] | ||
Revision as of 15:54, 26 November 2018
Warning
Oops, you found us!
This is an internal workspace for Artefactual staff who are drafting new wiki content or major revisions to existing pages to test out their edits. Contents here are considered draft, unstable, and temporary.
Resources/Translation
Thank you for your interest in contributing user interface translations to the AtoM project! Your contributions help to make AtoM a multilingual application with a global reach.
In our continuing efforts to make the process of translating the AtoM interface more efficient, Artefactual Systems has moved from its previous translation service, Transifex to Weblate, an open source web-based translation management system supporting continuous translation from multiple sources. More than one translator can contribute translated strings, making the process fast and easy, and enabling Artefactual Systems to publish translations more often. Everything is web-based using Weblate, meaning you can access your translation work via any web browser.
This page will introduce you to the AtoM Weblate translation project, so that you can sign up and begin contributing translations. If you have contributed through Transifex in the past, you will need to open a new account with Weblate to continue contributing.
Seealso
- Interested in contributing to our project documentation? We have a separate page for that! See:Contribute documentation
- Looking to contribute code to AtoM? See: Contribute code
- Check out our User Manual for information
on how to translate content or interface elements locally (in your installation only) - see the Multilingual section.
You can see the AtoM project in Weblate here:
Contents
Sign up for an account with Weblate
1. Navigate to https://translations.artefactual.com/ to see current Artefactual translation projects. While everybody can browse these projects, view translations or suggest them, only registered users can save translations, and are credited for every translation made.
2. Click on Register to create an account.
Fill in your information and click Register.
Note
By registering you are agreeing with Weblate to use your name and email in version control commits and provide your contribution under the terms of the Creative Commons Attribution Share Alike 4.0 ([1]) license that applies to all AtoM documentation.
Seealso
Weblate also supports several third-party registrations and provides links from their registration page.
After you submit your registration you will be sent an activation email to the email account you used to register. Follow the instructions in the email to complete your registration and activate your account.
Seealso
Weblate has its own help documentation - here's a help page on getting started:
- [https://docs.weblate.org/en/latest/user/index.html Weblate Documentation -
Translators guide]
Log in and set your preferences
3. When you activate your account you will be redirected to a page that asks you to agree to Weblate's Terms of Service and you will be prompted to set a password.
4. When you have logged in you will see the Dashboard.
You can set your preferences by clicking on "Manage languages", "Manage watched projects", or "Settings" and selecting your preferences in the navigation tabs.
5. Select the languages you want to see on your dashboard from the Languages tab, and projects from the Subscriptions tab before you begin to contribute translations.
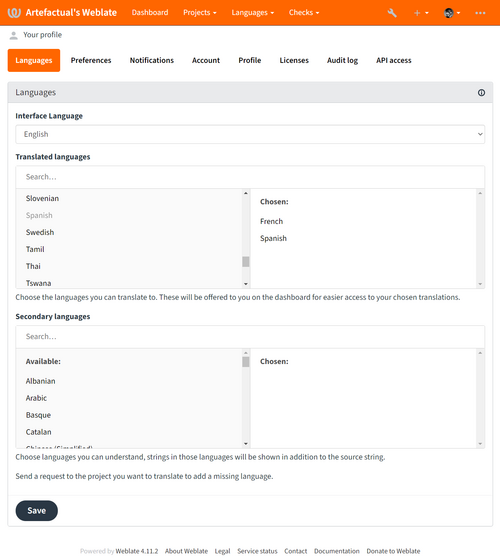
From the Language navigation tab, choose the languages you wish to translate and those you want to follow. Your primary languages are the languages you wish to translate. They will show up on your dashboard as "Watched languages" when you log in or navigate to the dashboard. Secondary languages are languages whose translations you want to follow. Strings that have been translated in these languages will appear on the translation page (see #Begin translating). When you have made your selections, click Save. You can change these settings at any time but clicking on the language links to add or delete from the primary and secondary language choices.
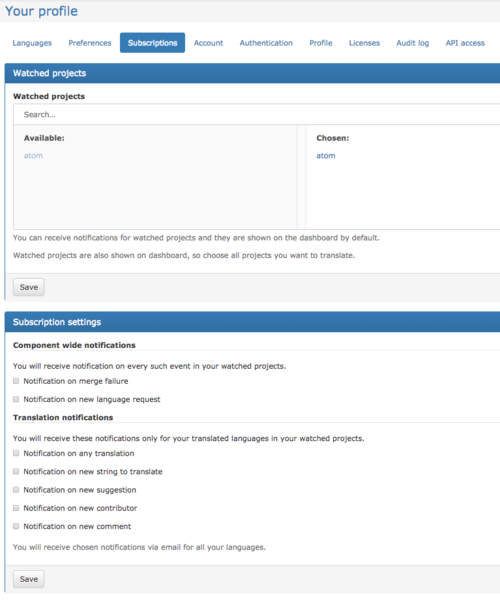
From the Subscription tab, choose the translation project(s) you wish to follow and click Save. Scroll down the page to select notifications you want to receive about the project(s) you have subscribed to. Save your selections.
These settings can be changed or updated at any time.
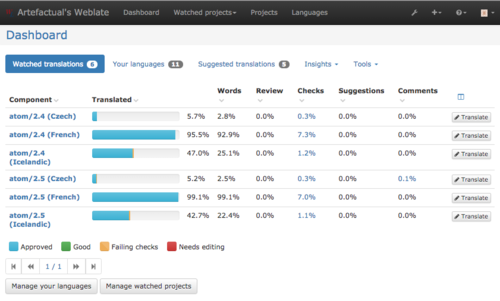
Once you have chosen languages and subscriptions (projects), these will appear on your dashboard, showing the status of translation for each of your chosen languages and projects. You will also see a Watched projects dropdown list on the main navigation bar at the top of the page.
You can also see all languages available to a given project and their translation status by selecting a project from Watched projects in the main navigation bar.
Important
Please review the options available in the list prior to requesting a new language! In many cases, we have had requests for different locales (for example, requesting "fr_FR" for France French, instead of working in the existing "fr" French project), but AtoM does not always support these very well. If at all possible, please work within the existing projects, or try to select the most generic option, without locale codes. We'll work with you if there are no other options, of course - but if you can avoid using a specific locale, it will make merging and maintaining your translations in AtoM much easier!
You can view a list of all languages supported in AtoM, with their corresponding language codes, here:
6. Other preferences on how you want Weblate to be displayed are available from the Preference tab in the menu bar. See the Weblate documentation for details.
Begin translating
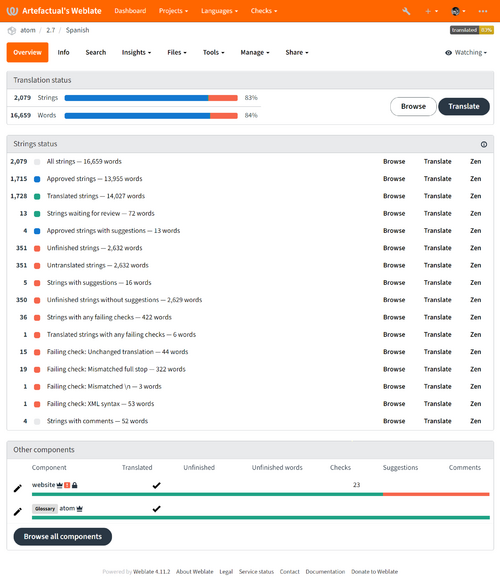
7. From your dashboard you can navigate to the translation screen in two ways. The first way is from the Component column. Click on the project/language you want to translate. This will take you to the Overview screen of the main translation page for that language. Here you will see links that can take you to the general translation screen or to filtered sets of strings for translation. Clicking on the Translate button or one of the filtered sets will take you to the translation screen.
The second way is to click on the Translate button to the right of the language you want to translate. This will take you directly to the translation screen.
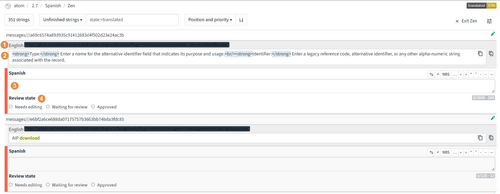
Once you have reached the translate screen you will see a list of items needing translation. Each item shows (1) the source string (location in the Artefactual database), (2) translations in any languages you are watching, (3) the term to be translated, and (4) the edit area for your translation.
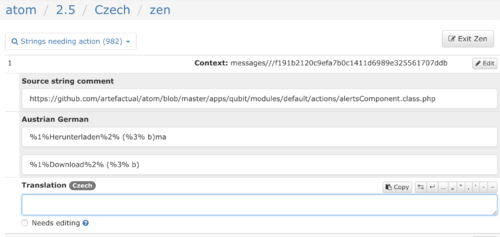
8. The default view is Zen mode - a simplified screen in which you see a list consisting of the source string, source string comment and translations from secondary language choices if you have any, and a field in which to enter the translation in your chosen language. In the screenshot below you see that the language chosen for translation is Czech and the secondary language is Austrian German.
Note
You can switch from Zen mode to full mode by clicking Exit Zen. You can set the translation editor mode to Full Editor in Settings/Preferences.
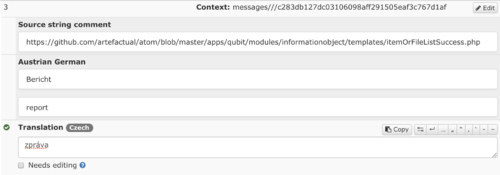
Your translation will be saved automatically, and checked, once you move your cursor out of the translation field.. If your translation passes the checks, a green checkmark will appear to the left of the translation.
If your translation fails any checks, a red "x" will appear. Scrolling over the "x" will highlight the syntax error.
You can work through the list of strings needing translation, choosing those you want to translate.
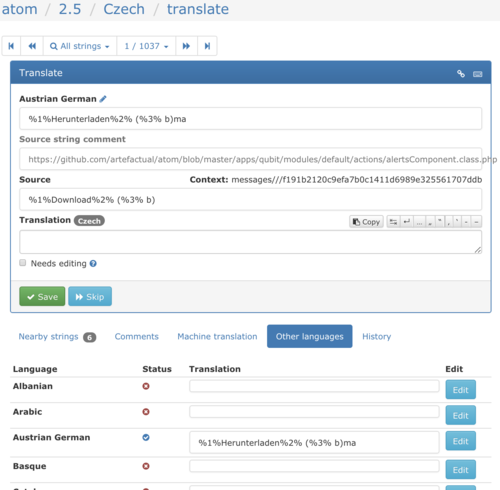
9. You can also translate in several languages simultaneously. To do so, choose any of your primary languages from the dashboard, choose Translate or any preferred filtered set, and exit Zen mode. You can then enter your translation in the primary language, and by scrolling down to Other languages enter or edit translations for that same string in as many languages as you like/code> to the right of the translation field for each language. If you do not want to edit the string that is offered, click on Skip in the main translation box. Move to the next string by clicking the counter at the top of the screen.
Important
When you are entering translations in Zen mode, your entries will be saved automatically. When you are in Full editor mode, however, you need to save the translation in the primary language.
Thank you for helping us translate AtoM - it is through your participation that we can make AtoM a truly international application!
Got questions, or find something that's not covered here that you think would be helpful? Let us know via the AtoM User Forum, or send us an email at translate@artefactual.com.


