Workspace
Warning
Oops, you found us!
This is an internal workspace for Artefactual staff who are drafting new wiki content or major revisions to existing pages to test out their edits. Contents here are considered draft, unstable, and temporary.
Contents
- 1 Contributing documentation to the AtoM project
- 2 Suggest minor fixes to Artefactual
- 3 File an issue in our documentation repository
- 4 Contribute documentation yourself via GitHub
- 5 Contributing documentation using Vagrant
- 5.1 Generate an SSH key and configure a forwarding agent
- 5.2 Add your public key to GitHub
- 5.3 Fork the AtoM documentation project
- 5.4 Change the AtoM vagrant box to track your new fork
- 5.5 Add the files to your local text editor
- 5.6 Make changes and commit them to your fork
- 5.7 Keeping your fork up to date
- 5.8 Open a pull request
- 5.9 Add fixes and squash your commits
- 5.10 Celebrate
- 6 Questions?
- 7 Contribute documentation translations
Contributing documentation to the AtoM project
Want to help us improve our documentation? All AtoM documentation is publicly available under a Creative Commons Attribution-ShareAlike 4.0 Unported licence (CC BY SA). We rely on our community of users to help us keep our documentation clear, comprehensive, and easy to use - if you see something missing or broken, or have an idea about how to improve or expand upon our existing documentation, please consider getting involved. There are several ways you can help AtoM improve its documentation:
- Suggest minor fixes to Artefactual
- File an issue in our documentation repository
- Contribute documentation yourself via GitHub
- Contribute translations
Also, check out our Documentation contribution guidelines
Suggest minor fixes to Artefactual
See a typo or a broken link? Have a question or a minor suggestion? If you've noticed something that can be improved in our documentation, but don't have the time or resources to fix the problem yourself, we want to hear from you!
Contact us at: webmaster@accesstomemory.org
Important
AtoM documentation is freely maintained by Artefactual Systems, lead developers of the AtoM project. We do our best to ensure that our documentation is comprehensive, but as an open-source company that freely gives away software, documentation, and user support in our User Forum, please keep in mind that we have to prioritize our client assignments so that we can pay our bills and continue to provide free software and free community support. If you've submitted a suggestion for a fix to our documentation via webmaster@accesstomemory.org, thank you! If it takes us a bit of time to implement a fix, it may be because we are currently focused on a client project - we will address any reported issues as soon as we are able. As always with open-source projects, the best way to ensure a fix is implemented is to contribute the fix yourself - we encourage our community users to become active contributors to all aspects of our projects.
File an issue in our documentation repository
If you notice a problem in the documentation, start by filing an issue in the AtoM documentation repository with as much detail about the issue as possible. This is a good thing to do whether you're just reporting a typo, or about to submit a whole new section of documentation. Also, just because you file an issue doesn't mean you're committing yourself to addressing the requested fix yourself! We're happy to receive reports about how we can improve the AtoM docs.
Tip
You'll need a GitHub account to be able to file issues and contribute fixes. Signing up is free and easy - head over to:
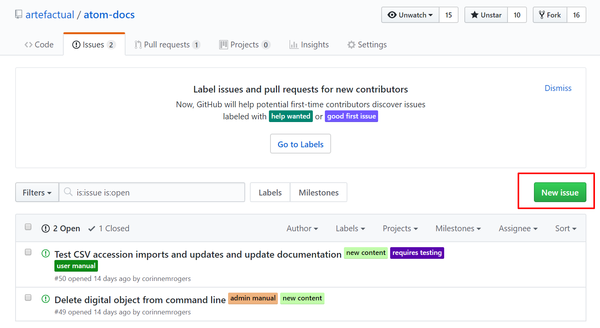
You can find the issues by navigating to the GitHub repository, and clicking on the Issues tab. You can look at any existing issues here for reference, and open a new issue by clicking the green button on the right side of the page:
Give your issue a descriptive title that gives us a sense at a glance what to expect. The body of the issue should mention, at a minimum:
- The page (and section, if possible) where the problem occurs
- The version of the documentation you are consulting
- A proposed solution
Here is an example issue requesting a minor fix in the Administrator's manual, that you can look at as a reference:
Contribute documentation yourself via GitHub
Is there a section missing from our documentation that you'd like to see? Or a section that you'd like to improve by adding clearer instructions, more screenshots, or alternative workflows? Help us improve our documentation by submitting new or revised content yourself!
There are two main methods of contributing new documentation. For smaller changes, it's easier to make your edits via GitHub's user interface. If you a more technically proficient user and you're working on a bigger contribution or would like to be able to work locally in a text editor before contributing your changes, we also have instructions on how you can configure the AtoM Vagrant box for documentation contributions.
Useful reference resources
- Sphinx documentation website
- reStructured Text primer
- AtoM documentation contribution guidelines
- How to write a commit message
- GitHub Help pages
Important
Before you begin, you should:
- Create a GitHub account if you don't have one already: go to https://github.com/ and sign up - it's easy!
- File an issue in our documentation repository
- Read our Documentation contribution guidelines
- Familiarize yourself with Sphinx and reStructuredText
Jump to:
Contributing documentation via GitHub
The following instructions will show you how to contribute changes to our documentation straight from our GitHub repository (here), using GitHub's user interface (GitHub Flow), which provides all the tools you need - including a text editor! If you are a more advanced user, you can do this from your own computer using a text editor and the command-line - see our instructions below for guidance.
An overview of the steps (described below):
- Find the document you want to edit (or the place to add a new one)
- Use GitHub's editor to make changes or additions
- Commit the changes
- Submit a pull request to Artefactual
- Dance! You've helped!
Find the document you want to edit
(Or the place to add a new one)
1. First, sign into your GitHub account at https://github.com (if you don't have an account yet, you'll need to create one first. You can do this on the same page.)
2. Navigate to Artefactual's AtoM Documentation repository: you can do this through the user interface by typing artefactual/atom-docs into the search bar at the top of the GitHub page.
Tip
What is a git repository?
A repository, or "repo", is simply a directory which contains your project work, as well as a few files which are used to communicate with Git. Repositories can exist either locally on your computer or as a remote copy (such as on GitHub.com). These instructions will show you how to create your own repository on GitHub.com, and then use this to submit changes to the AtoM documentation repository.
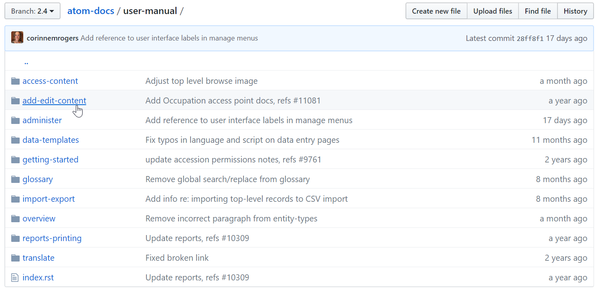
3. GitHub's user interface provides a graphical file-explorer to help you navigate through the text files in our documentation repository. The AtoM documentation repository's files are organized into folders that mimic the structure of the user manual found on the home page - for example, all files that relate to the User Manual section called "Add/Edit Content" are grouped together in a file called "add-edit-content". In GitHub, click on a folder to view its contents. Click on a .txt file to open it in-page.
Tip
Can't find the right spot in GitHub?
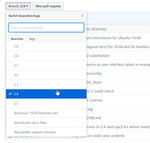
Don't forget to check the "Branch" drop-down - atom-docs is organized into several different branches, with the About/Contribute and FAQ docs on a different branch than the User and Admin manuals. Additionally, as we create new versions of our documentation for each major release, we will create new branches (2.0, 2.1, 2.2, etc) - so make sure you are editing or adding to the correct branch! Ideally, you will add fixes to the most recent docs, so we can carry those improvements forward.
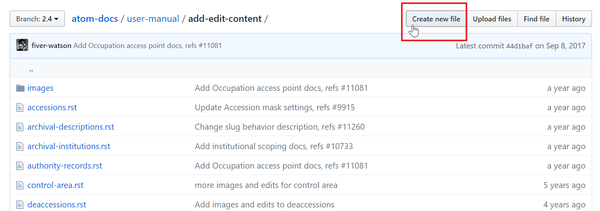
4. If you are adding a new page, navigate into the correct folder, and click the "Create new file" button at the top of the page.
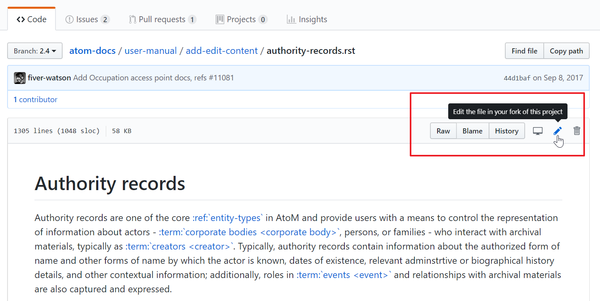
5. If you are editing an existing page, navigate to the correct reStructuredText file, so that you can see its contents previewed on GitHub's interface. Then, click the "Edit" button (a pencil icon) found above the file preview:
6. GitHub will create a copy of the entire atom-docs repository in your chosen location (or in your own new repository if this is your first time using GitHub). Now you can edit to your heart's content without fear of breaking our production website or making the documents unavailable to other users. In git, this is known as "forking". At the top of the page, you'll see that now atom-docs is in your own repository (indicated by your chosen user name). You'll also see this message above the file editor, to remind you:
Use GitHub's editor to make changes or additions
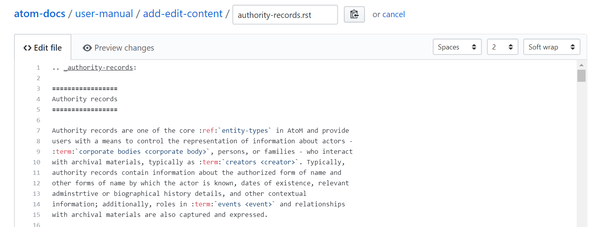
7. When you click the "Edit" button above the text file preview, a copy of the atom-docs repository is made in your repository (associated with your GitHub account), and you'll be redirected to a web-based text editor, where you can make changes to the file via your web browser. If you are adding a new page, the text editor will be blank when it opens, and you can begin entering text. As you work, you can click on the "Preview changes" tab to see a rendered version
Note
About that preview... GitHub uses Markdown, which is a different language than reStructuredText, which we use via Sphinx to maintain the AtoM documentation. This means that some elements (like section headers, bolding etc) will render properly in the Preview, but others (like code-blocks, hyperlinks, and glossary links, etc) will not. Don't worry if it doesn't look correct in GitHub's preview if you know the syntax is correct!
8. Make the changes you want to the file. When you are done, scroll to the bottom of the page - next you will commit the changes.
Important
Please review our Documentation contribution guidelines before submitting any changes. Thanks!
Commit the changes
9. When you are finished editing and/or adding files in the text editor, scroll to the bottom of the page. You will see a box with several text fields to fill in before submitting your changes.
Tip
What is a commit?
A commit, or "revision", is an individual change to a file (or set of files). It's similar to when you save a file, except with Git, every time you save, a unique ID is created (a.k.a. the "SHA" or "hash") that allows you to keep record of what changes where made when and by whom. Commits usually contain a commit message which is a brief description of what changes were made. (from the GitHub Glossary)
- Commit Summary: This is a required field. GitHub Help describes a "commit" as such: "Think of a commit as a snapshot of your project – code, files, everything — at a particular point in time". Your commit summary is a concise way to summarize the changes to the project that users will find in the commit. Commit summaries should be 50 characters or less: this is more like a brief title so users can determine what has taken place at a glance. Keep it brief and to the point. Check out these guidelines in the Git documentation.
Tip
When writing your commit summary, please remember to:
- File an issue for your change first, and reference it in the summary - e.g. "Fix typo in Entity types, refs #XX"
- Use the present active voice and be direct - "Fix typo in Entity types," not "Fixed typo..."
- Try to keep the commit summary to 50 characters or less
- Capitalize the first word
- Do not end with a period
For further tips on writing great commit messages, see: https://chris.beams.io/posts/git-commit/
- Extended description: This is an optional field, which we at Artefactual recommend using if you plan on editing our documentation. This is your chance to explain at greater length what the changes you made were, and why you felt you should make them. A concise message here will help us understand your work, and allow us to merge it into our documentation more quickly! Remember, you want to explain WHAT you did, more than why or how.
10. Once you've added a commit summary (required) and an extended description (recommended), click the "Propose File Change" button. GitHub will branch your changes, and redirect you to a page where you can compare the changes to the original, as well as submit a "pull request" to the AtoM documentation repository.
Tip
What is a git branch?
If you're making an app, a website, or working on documentation collaboratively, you might have a bunch of different features, ideas, or revisions in progress at any given time - some of which are ready to go, and others which are not. By default, the main branch of a repository is usually named "master" - in the AtoM documentation repository, we name each main branch after the documentation version it represents (for example, 2.0, 2.1, 2.2, etc). By "branching" away from the main code, you create a separate instance in which you can work on your changes, and then, when they've been reviewed and tested, merge them back into the main project. This allows multiple people to collaborate at once, and a single person to work on multiple different revisions at the same time without having to finish them all on the same schedule.
With these instructions, GitHub is handling the branching automatically, so you don't have to worry! But now you know a bit more about how git (and GitHub) works. Find out more about git here.
Submit a pull request to Artefactual
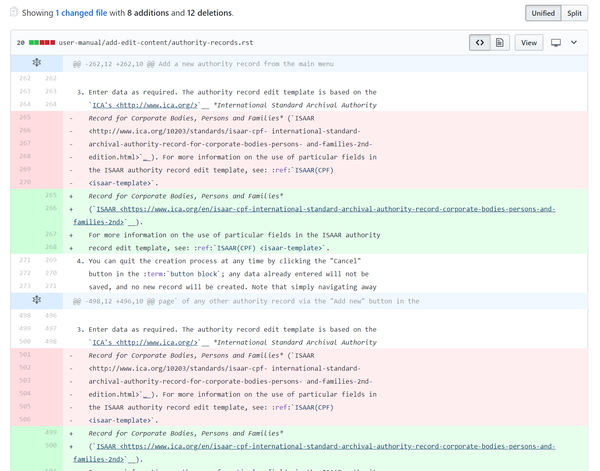
11. Once you've finished your changes and clicked the "Propose File Change" button, GitHub will redirect you to a new page. On the bottom half of the page, you'll see a "diff" - a graphical representation of the changes you've made - the red fields with the - minus symbol in the sidebar indicate content that was changed/removed, while the green fields with the + plus symbol in the sidebar indicate the new content that was added. When you submit your changes to Artefactual, we'll be able to see this too - it offers us a quick way to understand where you've made changes, what was changed, and why.
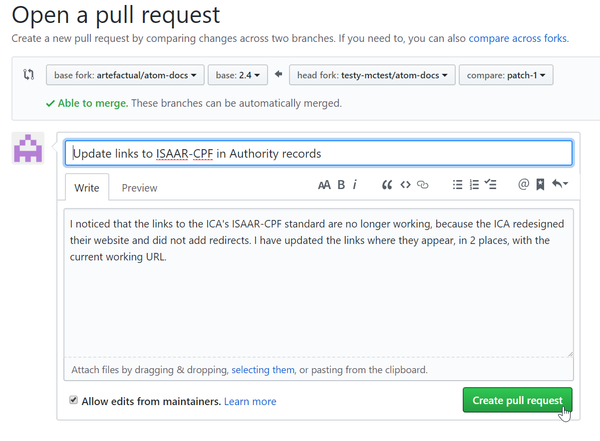
12. At the top of the page, you'll see your commit summary and description, with a reminder above it from GitHub (in blue) that the changes are still only in your repository. To submit them to Artefactual for inclusion in the AtoM documentation, click the "Send pull request" button on the right- hand side of the page.
Tip
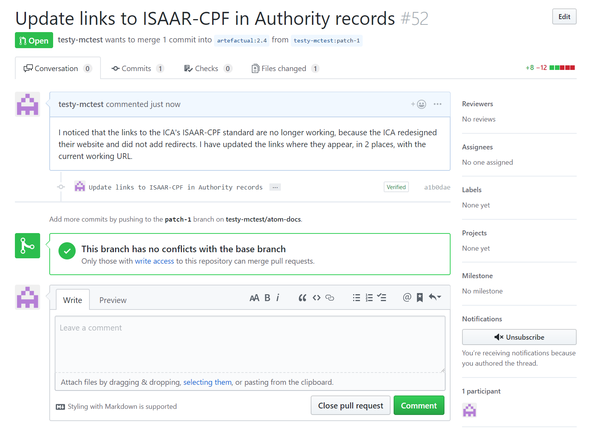
What is a pull request?
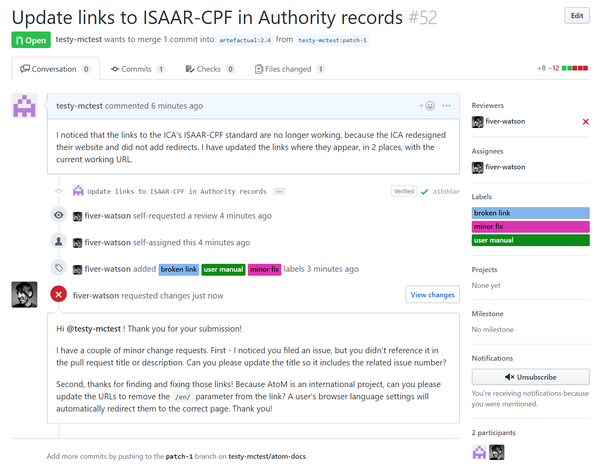
Pull requests are proposed changes to a repository submitted by a user that will be accepted or rejected by a repository's collaborators (in this case, Artefactual, the maintainers of the AtoM documentation). You can see the GitHub Glossary's definition here, and more information from GitHub on using pull requests here.
13. The page will reload with information about your pull request - you can see a summary of what you want to merge where at the top of the page (i.e. your patch or fix into one of our documentation branches). Your commit message and summary will be below - we'll see a similar message on our end when we receive the request.
14. Artefactual will receive your pull request, and one of our team members will review the changes. If there's a problem, we can send you a message via GitHub, or even begin a discussion right on the code! This way, if there's something we don't understand about the changes you've made, we can connect with you directly. This is very similar to the code review process we undertake on code submissions from developers - see our Code review wiki page for more information.
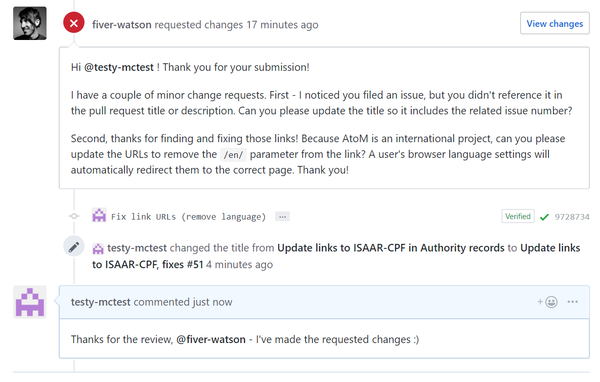
You'll be able to see a summary of our changes and the status of the review on your pull request. We'll add comments if we have changes to request.
15. If you need to make changes, you can simply return to the files and edit them in place. Follow the same steps as above. When you submit your commit, GitHub will give you the option to submit it as part of your pull request. You can also reply on the PR comments thread to ask for clarification or help, or to let us know that the requested changes have been implemented.
16. Once we've accepted the pull request and merged it into our repository, you'll get a notification (you'll probably get an email too, unless you've changed your default GitHub account settings). You'll be able to see the status of any changes right on the pull request.
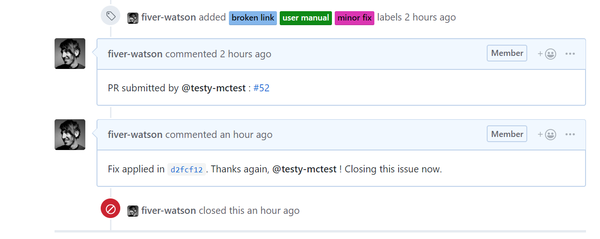
17. Success! Your contributions have been accepted, and merged into the AtoM documents. You should be able to go to our website and see them in the documentation. Thanks for helping out! We'll also close the related issue.
18. Finished! You did it! Thank you for helping to improve the AtoM documentation! It's time to dance!
Contributing documentation using Vagrant
For more technically proficient users who intend to work on larger changes, and/or simply prefer being able to work in a local text editor, the following instructions will guide you through the process of configuring the AtoM Vagrant box so that you are able to create pull requests against the public AtoM documentation repository.
Important
Before you begin, you will need:
- To have created a GitHub account - you can create one here if you don't have one already; it's free!
- To have a local text editor good for working with source code - if you don't, we recommend atom.io, an open source text editor created by GitHub
- To have the AtoM Vagrant box installed - see our documentation here and some detailed slides here
Before you start making edits, you should also:
- File an issue in our documentation repository
- Read our Documentation contribution guidelines
- Familiarize yourself with Sphinx and reStructuredText
Jump to:
- Generate an SSH key and configure a forwarding agent
- Add your public key to GitHub
- Fork the AtoM documentation project
- Change the AtoM vagrant box to track your new fork
- Add the files to your local text editor
- Make changes and commit them to your fork
- Keeping your fork up to date
- Open a pull request
- Add fixes and squash your commits
- Celebrate!
Generate an SSH key and configure a forwarding agent
We're going to be creating a fork of the AtoM documentation repository into your GitHub account, and we want to be able to commit our local changes to your repository. To be able to do so remotely from the Vagrant command-line, we first need to create an SSH key and link it to your account, so you can authenticate and interact with your GitHub repositories remotely.
Tip
What is an SSH key?
Secure Shell (SSH) is a cryptographic network protocol for operating network services securely over an unsecured network. The best known example application is for remote login to computer systems by users. SSH provides a secure channel over an unsecured network in a client-server architecture, connecting an SSH client application with an SSH server. Common applications include remote command-line login and remote command execution, but any network service can be secured with SSH.
An SSH key is a form of password management for SSH connections, that uses public-key cryptography to provide a more secure way of logging into a server with SSH than using a password alone. While a password can eventually be cracked with a brute force attack, SSH keys are nearly impossible to decipher by brute force alone. Additionally, you can be authenticated by the server without ever having to send your password over the network - anyone eavesdropping on your connection will not be able to intercept and crack your password because it is never actually transmitted.
Generating a key pair provides you with two long string of characters: a public and a private key. You can place the public key on any server, and then unlock it by connecting to it with a client that already has the private key. When the two match up, the system unlocks without the need for a password. You can increase security even more by protecting the private key with a passphrase. This public/private key pair accomplishes two functions: authentication, where the public key verifies that a holder of the paired private key sent the message, and encryption, where only the paired private key holder can decrypt the message encrypted with the public key. This means that you can share your public key broadly, but your private key should never be shared.
As well as offering additional security, SSH key authentication can be more convenient than the more traditional password authentication. By default, using an SSH key requires unlocking your private key with a secret passphrase upon each connection. However, when used with a program known as an SSH agent, SSH keys can allow you to connect to a server, or multiple servers, without having to remember or enter your password for each system. Instead, the SSH agent will securely hold your key in memory and present it when needed - so you only need to enter your private key master password once, when you first load the key.
An SSH key pair can be generated on your local computer. For Mac and Linux users, we can use the built-in SSH agent functionality included with the O/S to manage this. For Windows, Microsoft does not currently include an SSH client by default, so we'll use a third-party tool for generating and managing our key, as well as connecting to the Artefactual Vagrant box environments.
SSH keys - Mac and Linux users
If you are using a Mac or a Linux based computer, here are instructions for generating a password protected key, and adding it to your keychain:
Keep a password-protected copy of your key somewhere secure on your local computer. Make sure the private key password is unique and secure!
SSH keys - Windows users
Because Microsoft does not include an SSH client by default with Windows, our Vagrant instructions recommend that Windows users use PuTTY to SSH into the Vagrant environment. PuTTY can be downloaded with a suite of other tools, which includes PuTTYgen, a tool to generate SSH key pairs, and Pageant, an SSH forwarding agent (similar to ssh-agent in Linux environments). Since we are going to use PuTTY for SSH, we can use PuTTYGen and Pageant to create and manage our keys as well.
You can download PuTTY, PuTTYgen, and Pageant here:
Note
The first option on the page is a package download, that includes all 3 utilities we need. However, if you've already downloaded PuTTY without Pageant and PuTTYgen, there are separate downloads available for these utilities lower on the same page.
Once you've downloaded and installed the utilities we are going to use PuTTYGen to generate our SSH key pair. To do so:
1. Launch PuTTYgen on your computer.
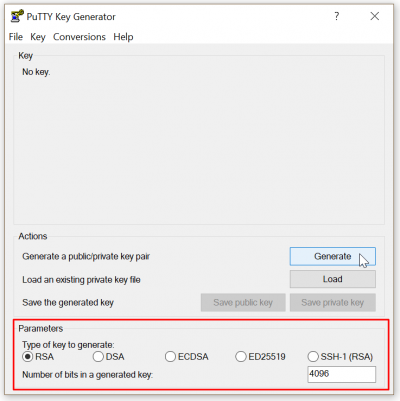
2. Configure the settings for your new SSH key. Let's use RSA, with 4096 bits:
3. Once you've configured the settings, click "Generate"
4. PuTTYgen will ask you to move your mouse over the blank area of the dialog. This is used to generate randomness in how the cryptographic key is generated.
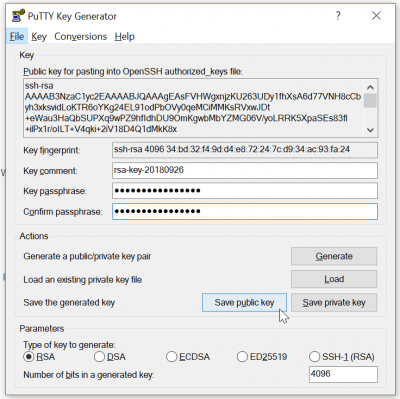
5. When complete, you will be shown the public key, and given the option to save both the public and private keys:
6. Make sure you save the private key! We recommend saving the public key as well for the next step (but if you don't there is a way we can use PuTTYgen to get it later). We also recommend following the naming conventions of keys generated in linux - call your public key id_rsa-pub and your private key id_rsa. PuTTYgen will save the key in a .ppk format, which can be used by Pageant for SSH agent.
We're now ready to configure Pageant to manage our key and act as a forwarding agent!
Pageant is an SSH authentication agent designed for use with PuTTY. It holds your private keys in memory, already decoded, so that you can use them often without needing to type a passphrase.
Pageant documentation:
- http://the.earth.li/~sgtatham/putty/0.67/htmldoc/Chapter9.html#pageant
- See also this helpful Digital Ocean summary tutorial
Pageant can load your SSH key, and then pass it to PuTTY when authentication is requested. To enable this, you will need to change one setting on your saved AtoM Vagrant PuTTY configuration. To do so:
1. Open up PuTTY, and then click on your saved AtoM Vagrant profile. If you haven't created one yet, let's do so now:
- In the "Host name (or IP address)" field, enter the Vagrant box IP, which is 10.10.10.10
- Make sure the Port field is set to 22
- Give the session a name in the "Saved Sessions" field below - I've callled mine "AtoM Vagrant"
- Using the navigation menu on the left, go to Window > Translation, and make sure that the Remote character set is set to use UTF-8
- Click on "Session" at the top of the sidebar menu to return to the main page, and click "Save" to ensure these credentials are saved!
2. Now let's make sure that PuTTY can retrieve the key from Pageant. Using the sidebar menu again, navigate to Connection > SSH > Auth. Make sure the following options are checked:
- Attempt authentication using Pageant
- Allow agent forwarding
3. Leave any other boxes already checked/unchecked as you found them. Remember to click on the top menu item, "Session," to return to the main page, and then click Save!
Now Pageant will be able to pass your SSH key when required. See also:
4. Your process for starting up your Vagrant box and using Pageant to handle your SSH key will now look something like this:
- Launch Pageant
- Double-click the Pageant icon in your task bar to open it, and then click "Add"
- Pageant will open a file explorer. Navigate to your saved .ppk file - AKA your password-protected private key - and double-click to open it.
- If your key is password protected (as it should be!) then you will be prompted to enter your password now
- When successfully entered, you'll see a bunch of characters representing your key in Pageant's main window. You can now close this window - it will not close Pageant, but merely minimize it to the tray
- Launch the vagrant box via Windows cmd and PuTTY
- Once you have a password-protected key stored locally for use with Vagrant via Pageant, you can re-use the key for multiple boxes.
Add your public key to GitHub
Next we want to link your public key to your GitHub account, so that we can authenticate remotely using the private key that our SSH agent will forward whenever we submit commands to your remote repository.
Follow these instructions:
Copying the public key - Mac and Linux
If you have generated your key in your host computer (e.g. your local laptop, rather than inside the vagrant box), then we can access your SSH key in your local .ssh directory.
Open a new terminal window - but do not SSH into the vagrant box. Instead, stay in, or change to your home directory. Remember, you can use pwd to show your current directory, and cd to change directories - cd .. will move up one directory, etc. For more basic navigation tips, see our Command-line 101 slides.
Once in your home directory, run ls -al to see all hidden files. There should an .ssh hidden directory - let's change into it, and look around:
cd .ssh
ls -al
You should see something returned like the following, if your key is present:
drwx------   4 myusername  staff   128 10 Sep 09:49 .
drwxr-xr-x+ 20 myusername  staff   640  5 Sep 14:39 ..
-rw-------   1 myusername  staff  3326 10 Sep 09:49 id_rsa
-rw-r--r--   1 myusername  staff   749 10 Sep 09:49 id_rsa.pub
Note the 2 id_rsa files. The first one is your private key, which should be password protected. The second is your corresponding public key. This is what we will need to add to GitHub, and what we should copy. Let's access the contents of the file now, using the nano CLI text editor:
sudo nano id_rsa.pub
The text editor should show you something that looks a bit like this:
ssh-rsa AAFAB3NzaC1yc2EAAAADAQABAAACAQDY7NPAkTC135zk/CxP1cIdlP7ePK0+eLqROfVeLR/lCu+l5kYw/RzpPh2kShLF9CiLtr32z77L8Ik/wFFbnyECw+GSE8Q1+JSPsfzJfCHYU93Dlu3Dg0Lckg3/wfvlaczouK6rRB1HHhAvsWQot/DkvXtKGGaZyhH2QMMnUjb5FqsNNzp715CdJzGpKKnOQFrUL8+F2tg0jmLvABUtsbGGkgvkRzec1ql22lRdX9nkPRLP66G54kKPjlrzP7Qu6hGNibA03ZQSG7nDX0yc/+Ug731iLMgHfwY6x4AwdCxyQJjMrPSnUMOCihKvMUIqzVRlqPNGzMTKnkwTJJljDy5wK+9513FV+nCc8mpBorat9ewK4vghTReqrIS2SG+Tl0miw3OC2MafACoIN+RqqEi9+FS1yovyxcMKn26HBaXfkJVaN4dG2QongSZD8VWBk44t6tyXQPPkJI4+ifHUTcLD/WjF6CGhTsy4lYyXzfHcWDQqXuPy0a99TbU6S29eA3Co3CzSK+zn8xkOpTl+tDXH0S8g6CPtXdLvO9bSiduTDcRqTKUy2QaGr/nTxl7IbLY+p3NMmrOHpKu9BW9bbDtz5cOJv0cEs8z7NV6wTp7PJ6T/zhG5tS102vkTBCy5AsmOKE1I2u7qX0l0Ay3TPox9f9xDaybGkxrlmTstRQqX4t== youremail@example.com
Copy this text, and continue following the GitHub instructions for adding an SSH key to your account.
Copying the public key - Windows users
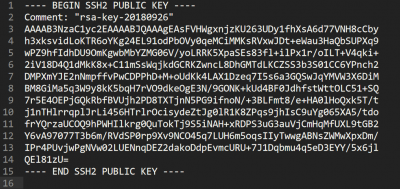
If, when generating your key with PuTTYgen, you saved a local copy of your public key, then you should be able to open this with a text editor (such as atom.io, Sublime Text, Notepad++, etc.) It should look something like this:
Note that the part we want to copy is the hash code in the middle - we don't need the header/footer.
If you didn't make a local copy of your public key, that's okay! PuTTYgen allows you to load an existing private key file into memory. If you do this, you can then change the passphrase and comment before saving it again; you can also make extra copies of the public key.
To load an existing key in PuTTYgen, launch PuTTYgen and then press the "Load" button. PuTTYgen will put up a dialog box where you can browse around the file system and find your private key file. Once you select the file, PuTTYgen will ask you for a passphrase (if necessary) and will then display the key details in the same way as if it had just generated the key. You can now copy the public key from the box at the top of the dialogue, or save a local copy of your public key, and then open it in a text editor.
Copy this public key, and continue following the GitHub instructions for adding an SSH key to your account.
Fork the AtoM documentation project
We're almost ready to start doing work! Now, to be able to make local changes and then submit them as a pull request, we first need to create a fork of the AtoM documentation repository in your GitHub account. In the next step, we'll modify the AtoM Vagrant box to track your version of the docs instead of the public one, so we can make changes and then submit them later. To create the fork:
1. If you're not already logged in, then log into GitHub
2. Navigate to the AtoM documentation GitHub repository: https://github.com/artefactual/atom-docs
3. At the top of the page, you should see a "Fork" button on the right side. Click it!
This will create a new copy of the atom-docs repository in your personal code repository. This will be indicated at the top of the page:
Change the AtoM vagrant box to track your new fork
The last configuration step we need to take is to configure your global git identity in the Vagrant box, and set it up to track your fork, instead of the public atom-docs repository. First, start up Vagrant - remember to follow any instructions provided above to configure your SSH agent so it can forward your SSH key when needed!
Now we'll want to configure our git identity in the Vagrant box. You can set the username and email associated with your GitHub account using the following two commands (be sure to swap in your GitHub username and email in the placeholders!):
git config --global user.name "your-username"
git config --global user.email your-email@example.com
You can check that this was set correctly, along with other default settings, with the following command:
git config --list
There are other things you can configure if you want, such as your default terminal text editor and other preferences. For example, often the default text editor inside your command-line terminal is set to use vim, but the key combinations for getting out of vim can be very confusing, especially for non-technical users. Instead, we can use nano, which provides a list of navigation commands right at the bottom of the screen. If you want to set git to use nano as your default CLI text editor, use the following:
git config --global core.editor nano
For more information and other configuration options, see:
Finally, let's set the remote origin to track your new fork. To do this, we will need to URL of your forked atom-docs repository - we'll add .git to the end of this in the command. The following example uses the URL for GitHub user testy-mctest's fork - swap in yours:
git remote set-url origin https://github.com/testy-mctest/atom-docs.git
git fetch
We're ready to make changes!
Add the files to your local text editor
We're ready to start making changes! However, first we need to figure out how to get the AtoM documentation files from the Vagrant box into our local text editor! Because the files are inside the virtual machine, we will need to connect to them over your local network discovery settings. You may first need to make some changes on your computer to be able to find them! Some tips for major operating systems are included below.
Windows
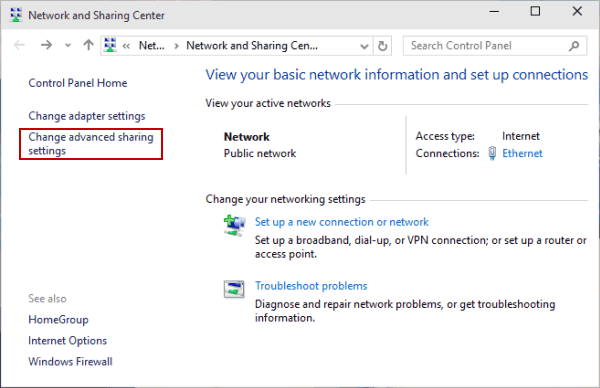
1. Open the Control Panel, and navigate to: Control panel > Network and Internet > Network and Sharing Center
2. Select Change advanced sharing settings from the left menu
3. Under the network discovery heading, choose "Turn on network discovery" in the settings, and then click the button to save your changes
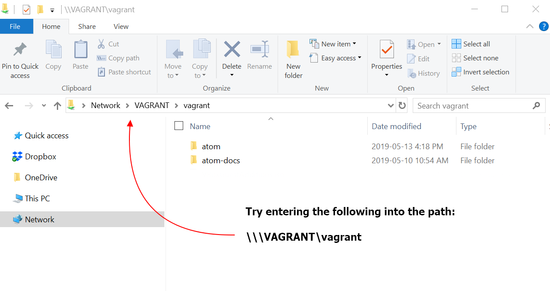
4. Now we can try to find the Vagrant box on your local network. Open up an Explorer window, and click on the Network option in the left menu.
Important
The vagrant box must be booted up and running to be discoverable on your network. If you haven't already run "vagrant up" and followed the other usual steps to start your Vagrant session, you won't be able to find it on the network!
Note that even in the best circumstances, for whatever reason this doesn't always work immediately in Windows. You may need to refresh the search, try more than once, etc. You can also try entering the path directly into Explorer's file path:
\\\VAGRANT\vagrant
We strongly recommend that, once you manage to access this, you add it to your Explorer "Quick links" so you can easily find it later!
5. When your computer has successfully connected, you will see folders “atom” and “atom-docs”. Open your text editor and drag the "atom-docs" folder into the editor.
You're ready to start making changes now!
Mac/Linux
On your Mac, open Spotlight by clicking the magnifying glass icon in the top right corner of your desktop, or by choosing command-space bar, and type cifs://10.10.10.10.
Important
The vagrant box must be booted up and running to be discoverable on your network. If you haven't already run "vagrant up" and followed the other usual steps to start your Vagrant session, you won't be able to find it on the network!
Hit “enter” to connect. Choose “vagrant”. When asked for a username and password, type “vagrant” for both.
When your computer has successfully connected, you will see folders “atom” and “atom-docs”. Open your text editor (atom.io in this screenshot) and drag “atom-docs” into the editor.
You're ready to start making changes now!
Make changes and commit them to your fork
You should now have the entire AtoM documentation project file hierarchy represented in the navigation pane of your local text edit. You can now navigate to the .rst files you want to edit and make your changes.
Important
Before making any major changes, please review the following:
You might also find the following resources helpful:
- Sphinx documentation website
- reStructured Text primer
- How to write a commit message
- GitHub Help pages
If you are making major changes (e.g. significant rewrites, new content, etc), please file an issue in GitHub first, and reference the issue in your pull request name when you are ready to submit. For more information on filing issues, see:
When you have finished editing, save your work in your text editor. Return to the terminal screen and run make clean html. Sphinx maintains a copy of the local output in the _build directory - running the make clean html does two things at once - first, it will purge all older builds from your _build directory; second, it will then generate new HTML preview versions, which can be found in _build/html.
Review and resolve any errors or warnings output when you run the make task, and preview the local HTML build version in _build/html. Make any fixes as needed, and repeat this process as necessary until you are satisfied with the outcome, and there are no more errors or warnings when running the make command. Now we're ready to commit your changes to your copy of the AtoM docs repository!
These instructions assume some basic familiarity with git and workflow management in distributed version control systems. However, we'll include some reminders below:
Adding files to a commit:
- Use
git status -sto see a list of all new and modified files in your local working directory - You need to add files from your local working directory to the staging environment before you can make the commit.
- Use
git add -Ato add all the files in your working directory - If you just want to make a selection (for example, if you fixed an unrelated typo along the way, and want to keep it as a separate commit), add each individually by providing the path, e.g.
git add user-manual/add-edit-content/archival-descriptions.rst - You can also add all the contents of a directory by just pointing to the parent directory. Unchanged files will be ignored. So for example, if you've added 3 images to the images directory in add-edit-content, you could add each individually, or just use:
git add user-manual/add-edit-content/images/
Preparing and pushing commits:
- Try to follow best practices when preparing commit messages. See this blog post from Chris Beams for a great summary
- If you are making major changes, remember to file an issue in our documentation repository first, and reference the issue number in the commit subject - for example "Add permissive slug setting docs, fixes #82" (see the PR here and the related issue here)
- Commits and pull requests should be atomic - that is, they should relate to only one specific thing at a time. If you are rewriting accession docs and find an unrelated typo in the physical storage documentation, keep that change in a separate commit - and a separate pull request
- Commit titles should be 50 characters or less, ideally! If you need a longer explanation, add a description as well
- You can add a commit title without a description by using
git commit -m "your message here". If you just enter "git commit", you will be taken to a separate edit screen where you can add both a title and a longer description - When all the files in your local staging area have been committed, you can push them to your GitHub repository with
git push
Congrats! You're now ready to open a pull request against the public AtoM documentation!
Keeping your fork up to date
If you've been working in your local version of the documentation for a while, it's possible that there are new changes in the public documentation repository that you don't yet have. Before we open a pull request, we should make sure that your local fork is up to date.
GitHub has a good summary here:
Essentially, we will add the public atom-docs repository as an "upstream" repository from your fork, so you can pull in the latest changes. To do so, enter:
git remote add upstream https://github.com/artefactual/atom-docs.git
You can verify that the new upstream repository has been added properly with:
git remote -v
Now let's update your fork from the upstream branch - i.e. the public atom-docs repo. See this GitHub guide for more information:
An example: If you are working in the 2.6 documentation branch, you might do something like this:
git checkout 2.6
git rebase upstream/2.6
Troubleshooting
If you get an error when trying to rebase upstream, like this:
git rebase upstream/2.6
Cannot rebase: You have unstaged changes.
Please commit or stash them.
You can either commit your local changes, add a commit message, and push them:
git commit -a
git rebase upstream/2.6
git push
OR you can stash your local changes and then unstash them after rebasing:
git stash
git rebase upstream/2.6
git stash pop
Tip
For more on stashing with Git, see:
OR you can throw them away
Warning
BE CAREFUL: THIS WILL DELETE ALL LOCAL CHANGES YOU HAVE MADE!
git reset --hard
If the files you have been altering have also been altered in the public repository while you've been working, then it's possible you will run into a conflict. Merge conflicts happen when you merge branches that have competing commits, and Git needs your help to decide which changes to incorporate in the final merge. Generally, you'll have to find the places in the files where the conflicts are listed, pick which version of the changes you want to keep, and delete any extraneous content that you don't want. Below are some resources to help get you started:
- GitHub: About merge conflicts
- GitHub: resolving a merge conflict using the command-line
- StackOverflow: suggestions on using git mergetool to resolve conflicts
- GitHowTo: Resolving conflicts
Open a pull request
GitHub has a great guide here:
A few reminders:
- Make sure you are submitting your pull request against the correct branch of our docs! We version the AtoM documentation into separate branches for each major release (e.g. 2.3, 2.4, 2.5, etc)
- The Commit best practices are also useful for preparing good Pull request summaries! Make sure we have a clear overview of what you've changed and why
- If you are making major changes, remember to file an issue in our documentation repository first, and reference the issue number in the PR subject - for example "Add permissive slug setting docs, fixes #82" (see the PR here and the related issue here)
Our team will be notified once you've submitted your pull request - we'll review the work, and if we have questions or feedback, we'll post comments directly on the pull request. Make sure GitHub account settings are configured to notify you of changes, so you can follow up!
Add fixes and squash your commits
Once you've submitted your pull request, the Artefactual team will review the changes. If there's a problem, we can send you a message via GitHub, or even begin a discussion right on the code! This way, if there's something we don't understand about the changes you've made, we can connect with you directly. This is very similar to the code review process we undertake on code submissions from developers - see our Code review wiki page for more information.
You'll be able to see a summary of our changes and the status of the review on your pull request. We'll add comments if we have changes to request.
If you need to make changes, you can simply return to the files and edit them in place. Follow the same steps as above - when you push a new commit, GitHub should automatically include it as part of your pull request. You can also reply on the PR comments thread to ask for clarification or help, or to let us know that the requested changes have been implemented.
Squashing commits
In some cases, we may request that you squash your commits when you update your PR, to keep the commit history clean and easy to understand.
Tip
What does squashing mean in git?
The term squashing refers to consolidating multiple commits into one single commit, for the purpose of simplifying the project history. When there are many small commits, including minor revisions to previous work, a lot of the commit history is only relevant for the developer who generated it, so it's considered best practice to simplify this before submitting your work to a shared repository. Git provides users with the ability to rewrite the history of a commit for cases such as this - so squashing in this context refers to moving the changes introduced in one commit into its parent, so that you end up with one commit out of two or more.
For more general information on this topic, see the following chapter in the Git Book:
There are several ways that you can do this in git, but our preferred method is to use git's interactive rebase. To do so:
1. Run git rebase using interactive mode. The numeric value after our HEAD variable in the following command tells git how many commits we want to fetch. For example, if your pull request currently includes 4 commits (of which the first contains the body of your work, and the next three are minor corrections), then we can see all of these commits using 4 as the variable, like so:
git rebase -i HEAD~4
This should display something similar to the following output:
pick d2c53e5 Update CSV import docs, fixes #50
pick efaf92d Fix a typo in CSV import rewrite
pick 5bc533c Add another section to the rewrite
pick 3d304f2 Another minor formatting fix

# Rebase d2c53e5...3d304f2 onto 609f966 (4 commands)
#
# Commands:
# p, pick = use commit
# r, reword = use commit, but edit the commit message
# e, edit = use commit, but stop for amending
# s, squash = use commit, but meld into previous commit
# f, fixup = like "squash", but discard this commit's log message
# x, exec = run command (the rest of the line) using shell
# d, drop = remove commit
Note
Notice that there are 4 commits shown with the word pick next to them. If we ran the command using HEAD~2, this list would only include the 2 most recent commits. You can also show other unrelated commits (i.e. include more - HEAD~8) and simply leave them untouched in the following steps, if desired.
What we're seeing above is a list of the last 4 commits for the repository. Note that it's in reverse order - the bottom commit is the most recent one. Instead of merging four commits, three of which are minor fixes to the first commit, it would be tidier to have one commit that included all those fixes. To squash them together, you'll need to decide which changes are minor (or fixups) - in this case, the 3 last commits. Let's change them so they will be squashed.
2. using our command-line text editor, we now want to edit the word "pick" before the 3 corrections, and change them to "fixup" - once saved, this tells git that these commits should be squashed into the first commit (still marked as "pick" - i.e. use this one), and their commit message discarded in favor of the original message associated with the commit you are keeping.
Tip
When you were setting your global git identity, did you set your default preferred command-line text editor?
If not, odds are good that the default editor is vim - vim's commands can be pretty confusing if you are not used to them! Here are some tips:
- By default you are in "normal mode" - you can view, but not edit
- Press
ito enter insert mode, so you can make edits - Pressing
ESCwill return you to normal mode (not insert mode) - When you've made edits and then have returned to normal mode, press
:wqto save and exit (write and quit) - You can quit without saving when in normal mode with
:q - If you are reordering commits,
ddin insert mode will cut the current line and copy it to the clipboard, andPwill paste the clipboard content before the current line
You can read more about vim here:
Once you've made the necessary changes, save them and exit the editor:
- In vi or vim, use ESC to ensure you are in normal mode, then enter
:wqto save and exit - In nano, use
CTRL+o, press enter, and thenCTRL+x
3. Before we proceed, let's confirm we've done this correctly. Run the command: git log -1 to show the latest commit - it shoudl be the main commit you want to keep, and not any of the smaller fixes we marked with fixup. It should look something like this:
commit d2c53e548e339acdd5e1c3e2762347d1562b195f
Author: username <email@example.com>
Date:   Wed Nov 14 15:54:08 2018 -0700

    Update CSV import docs, fixes #50
If it's not, you can run git log to see a full list of all commits, and figure out what you missed. Repeat the steps above as needed.
4. Once you've successfully squashed your commits, we'll force push the fixed-up commit:
git push -f
Success!
Celebrate
You did it! Thank you for contributing to the AtoM documentation!
Once we've accepted the pull request and merged it into our repository, you'll get a notification (you'll probably get an email too, unless you've changed your default GitHub account settings). You'll be able to see the status of any changes right on the pull request.
It's time to dance!
Questions?
If there's something that you're not clear about in these instructions, or you've run into an unexpected error, send us an email at webmaster@artefactual.com, or make a post in the AtoM User Forum!
Seealso
Contribute documentation translations
Want to help us translate these docs into your language? We rely on our amazing community volunteers to help us make AtoM a truly international application. Currently we are using Transifex to help us manage our project translations.
Warning
This is still a work in progress! We hope to be able to add our documentation to Transifex in the future. In the meantime, we're always looking for help translating AtoM itself! See: Contribute translations


